Rendering my resume in webgl
Making a plan
I have my resume which is a PDF on my computer, and I want to see it on a canvas element using webgl. Without knowing much more about how any of this would work, the mental model in my head starts at:
PDF → Webgl.
Clearly there are steps missing in between leading to a mental model of the following with the goal to fill in the blanks:
PDF → __ → … → Webgl → ??? → Profit
Ultimately the only truth I have here is that the end state is Webgl render some formatted text. Therefore, I think it makes sense to work backwards. With this in mind I see that I common strategy is to render text onto a canvas element before rendering the canvas as a texture.
Continuing to work backwards, how to go from PDF → __ → canvas. The first suggestion I see is to use the PDF.js library to do all of this for me like so:
Okay so looks like with one additional library, I could implement a relatively simple local setup:
- Add my resume pdf to static contents at my domain
- Use PDF.js to load this file into an out of view canvas element
- Render the canvas element as a webgl texture.
How hard could it be?
However, since my mission is to minimize dependencies I have to wonder how hard would step 2 be to implement myself? I already suspect it would not be an easy undertaking and a first glance of the source code at pdf.js github supports this. Some of the high level concepts of manually parsing pdf files include:
- Input format: PDF files are made of streams of instructions. Parsing PDFs requires implementing ISO 32000-1 and ISO 32000-2 specifications, which are extensive and complex. Also PDFs use their own graphics instructions (e.g., “moveto”, “lineto”) that need interpretation.
- Reading the file structure: The header, body, cross-reference table, and trailer.
- Decoding objects: Fonts, images, and page content streams.
- Understanding compression: Many PDFs use Flate (zlib) compression for streams. Most PDFs compress streams, requiring decompression algorithms like Flate or JPEG.
- Building/integrate parsers for: Object definitions, Page dictionaries, Fonts and embedded resources. For example: PDFs embed custom fonts, which need to be extracted and rendered.
I highly recommend this article by Jay Berkenbilt: the-structure-of-a-pdf-file. Jay has written several posts on medium around the subject of PDF files: https://medium.com/@jberkenbilt
I now want to abandon starting with PDF as my initial format. Ideally I still use a common resume format like .docx so that it’s still in theme. While checking back on the possible export formats from google docs, I am contemplating the difficulty in implementation vs styling of each. For example, markdown format would be the most simple format to manually render by hand but would not be very feature rich.
Let’s go with html format. In my head, at least html format would be a format I wouldn’t have to learn new but would provide all the necessary features.
Alright so how much work exactly would it take to manually render html to a 2d canvas context? Overall it seems that the complexity lies in the feature set to support. The most basic rendering could be done for lines of text to canvas as in the code example below. I think I can implement the fundamental feature set needed to render my resume: text, font size, font family, font color, bullet points, underlines, line height, indentation.
Again this could be done for me by using html2canvas library, which I have used in the past as part of https://www.playtherapyapps.com.
The plan
I now have an idea of a reasonable starting format along with relatively straight-forward idea to get the resume information onto webgl land.
html → offscreen 2d canvas → webgl
- host the html document, fetch document and begin parsing html response
- parse the html blocks and create a tree data struct holding the relevant information
- take the tree struct and write to 2d canvas
- write the the canvas to webgl texture.
- implement panning, zoom, etc.
Implementation part 1: html parser
I need to parse an html string into some format that I can than transfer to an html canvas. Again I think to myself, how hard could it be? The starting point here would be just to get some proof of concept working. I start by DOMParser to create a format I can traverse in the browser and simply render every line of text on a new row. The below code adds 20 to the y value every time a text node is read.
I get something basic but working as expected.
Now I would need to figure out how to arrange things with the correct styles and positions. My first try includes using window computed styles from the browser as below.
And… no change. Bad news, computed style includes no information for one big reason: this content doesn’t exist on the window. I also tried adding the style tag to the current windows head but that had no effect (expected). Two options in my mind are either to add the html content to the window in some hidden/off-screen format or to implement a set of css parsing and calculation. Parsing and calculating my own css and layout seems like not a path I’d like to go down at this point so I go for using an iframe to load the content. I can do this in place of using DOMParser
I can then use the iframe while rendering child nodes
When I log the styles to the console, it works! I now can get the formatting of a DOM node. After some tinkering I get the below results. Here I set each line of text to start at the top left of a row then subtracting the font size will render text align-items: end correctly.
Loading Fonts
One problem I additional problem I ran into was that I wasn’t getting consistent font-face styles loaded. The html downloaded from google docs embedded the font as @import url() inside of the style tag.
I seemed to get intermittent errors where locally, text would be in the wrong location. My initial theory was that the location of the text would be dependent on the correct font, and if the font hadn’t loaded yet then the coordinates would be off. I solved this locally by writing code to parse the html for the theme url and then load programmatically before running the rest of the parsing.
However, when deployed the text is all off again. In the network tab I could see 403 errors for the attempted fonts.
After a quick search, I found that the font I was using “Calibri” has been taken off of the google supported web fonts. While you can still access the font at https://fonts.googleapis.com/css?family=Calibri, it is no longer available for public use. To solve the problem, I instead use the font “Carlito”. This is a similar font that most importantly is dimension compatible with Calibri and therefore requires no additional updates for the resume to render properly.
Once resolving the font issue, I get some results as below.
There’s a few obvious problems including a bunch of weird spacing, missing indentation, and what the heck is going on starting with work related text?
After a bit of debugging I find a few major problems:
- the styling of the iframe throws the calculated widths/heights/etc. off
- the way that links are handled are such that every block in the line are treated as separated span tags and the span tag for the last bit of text doesn’t come with the dimensions I expected as seen in the image below.
This behavior is actually expected when I think about it longer as the span element must wrap to the beginning of the entire row even when the contents start mid-way in that block. This will simply make it a bit more difficult to render properly.
After setting the styling of the iframe so the contents take the correct space:
Things are getting a little closer. To complete parsing of pertinent information I pass through the document and create an intermediary data structure before rendering to webgl. With the styles, rect, and content of the document as a tree I have all the information needed to render.
Implementation part 2: canvas render
Now that I have all the data in a format I can traverse over relatively easily, I need to implement drawing this to html 2d canvas. As a heads up I will only be implementing the minimal set of functionality needed for my resume. This won’t include the majority of styling rules.
Starting with the top level of the parsed document body I can do a simple set of logic to handle block style tags.
- get the x, y position of the first non-string type element.
- Iterate over the document body tags, if the tag is a block style tag then render this tag and all children in a new row. The new row should start at left most edge and bounded at the right by the .
- Increment the y position for the next row by the height of the previously rendered row.
Next, renderRow may have 1 of 2 cases.
- the child is text node: render ctx.fillText as before and return an increment of x position + the amount of space the text takes.
- It is an html element: loop through it’s children and render. Use the current element to set font style, x/y coordinates (rect.top/rect.left), and the width the child should take up. (rect.width)
Handling text wrapping
The complex portion of the text wrapping is that when we fill text, the canvas doesn’t come with word wrapping. This is why we needed the bounding width from earlier. Luckily the canvas context does give us measureText . A naive approach takes the words in a given string, and can iteratively check if we should break to a new line.
We can do a little better however using a binary search algorithm rather than iterative. Basically:
- check if the first half of the array makes a line that is too larger
- if yes binary search the left half
- if no, binary search the right half
Handling :before and Responsive sizing
The last piece of content that I now don’t see on the page are the bullet points for each resume item. These are implemented as :before with content.
From MDN docs we can get the before content by getComputedStyle(tag, ":before")
Lastly, for responsive sizing we should multiply all sizing and coordinate related values by a scale factor based on the target canvas size - resume size. This is easily handled in canvas context using .scale
Implementation part 3: webgl render
Coming from canvas to webgl, I’m mostly in the dark at the time of starting this only having done some other webgpu learning based projects. I know that the overall idea is that there are more pieces to put together, but you can build much more sophisticated things.
Shaders
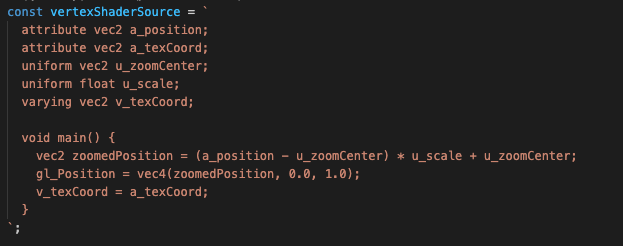
Similar to webgpu, webgl needs "shaders" - small programs that run on the GPU. You need two types: a vertex shader (which handles positions) and a fragment shader (which handles colors). The most basic shaders needed for the purpose of rendering a 2d canvas texture I found are:
a_position: The vertex positions in normalized device coordinates (NDC), ranging from-1.0to1.0for both x and y axes. Basically the entire webgl canvas is a 2 x 2 grid.a_texCoord: Texture coordinates mapped to the rectangle's vertices (e.g.,(0, 0)for the bottom-left,(1, 1)for the top-right). Whilea_positiondescribes the grid/frame,a_textCoorddescribes which corner of the texture being aligned to.u_texture: The 2D texture containing the canvas graphic, it holds the image data desired to be drawn.v_texCoord: Interpolated texture coordinates passed from the vertex shader. Every point on the frame must correspond to a point on the canvas.v_texCoordis like a "map" created by the vertex shader that says: “For this point on the frame, look at this point on the picture." These coordinates are automatically calculated for all points between the corners.precision mediump float;: This tells WebGL how detailed the math should be between from low to high. Sets the default precision for floating-point operations to medium, which is sufficient for most 2D graphics and ensures compatibility across different devices.varying vec2 v_texCoord;: Receives the interpolated texture coordinates from the vertex shader. In WebGL 1.0 and GLSL ES 1.0, thevaryingkeyword means "share this data between the vertex and fragment shaders." In this case: The vertex shader calculates the texture coordinates (v_texCoord). The fragment shader uses these coordinates to figure out which part of the texture to draw.uniform sampler2D u_texture;: A uniform sampler that represents the 2D texture (your canvas graphic) to be sampled.gl_FragColor = texture2D(u_texture, v_texCoord);: Applies the texture . This line is like painting each pixel of the square with a specific color from the picture. It usesv_texCoordto know where to look on the picture andu_textureto get the color.
Compile Shaders
The next part of the basic 2d webgl rendering is to compile the above shaders. Without this step, WebGL wouldn’t know how to process shapes or textures. Compiling the vertex shader compiles the blueprint for handling shape corners. Compiling the fragment shader, compiles the blueprint for coloring pixels.
Breaking this down:
const shader = gl.createShader(type);creates a new, empty blueprint (shader) based on the specified type. “I need a blank blueprint for how to process corners.” ,or “I need a blank blueprint for how to color pixels.”gl.shaderSource(shader, source);takes the blueprint and writes the instructions for it. The source is the actual GLSL (OpenGL Shading Language) code that tells the shader what to do.gl.compileShader(shader);Takes the instructions and compiles to the gpu language. Translates the GLSL code into something the GPU (graphics processor) can execute.if (!this.gl....)checks whether the GPU understands the instructions and successfully compiled the shader.If something went wrong during compilation, we can print the error message. Thegl.getShaderInfoLogfunction retrieves a detailed explanation of what went wrong.
Running the program
In order to run the gl program we need bootstrap code as below. Without a program, WebGL doesn’t know how to apply the shaders together.
I think most of this is self-explanatory but more information on gl.linkProgram(program); is that this is what links the multiple shaders together into a complete, usable program.
Basic Rendering
Now that we have gone through the basic bootstrapping, we can also go through the basic canvas to 2d texture code.
This seems like a lot but it’s not that complicated. Mostly I was familiar with kind of code after working with webgpu. Mostly think about the shader data we talked about before. This code is loading that data described above. For example, I went over the a_position variable in the vertex shader, while the position buffer here actually loads those data points into the program. Once running this code, I can now see a mirror image of the html 2d canvas onto the webgl canvas.
Zoom handling
This part took me the most time out of the webgl coding (a few days) as I had to un-rust my college math muscles. In the end I don’t have something perfect but I think it’s good enough. Firstly we need to modify the shader to take zoom into account while rendering. This will be a function of where we are zooming into (x,y) and the current scale.
Next we need buffers to handle this data like we did before in the render function.
I choose to encapsulate the zoom logic in a separate class.
Then we basically just need to fill in this function. I found difficulty in the following scenario:
- you start to zoom into a location
- you move the mouse and zoom further at a different location
The difficulty is that when you zoom to a point and move the mouse, the new coordinates that should be used are not relative to the full width/centered webgl canvas any more. The new coordinate system is based on an origin not the center with scaled dimensions. Conceptually I drew the following:
After zooming 3x to point A (say -0.2, 0.12), moving the mouse to point B and zooming more the zoom center should end up at say (-0.05, 0.12). However, if you imagine that the smaller box represents the whole view B relative to the canvas is in the top right quadrant ex: (0.3, 0.5). So we need to get B so that it represents a point relative to the “true” view, not the zoomed view. Some other context is that since the webgl land is always in the 2x2 grid of (-1,1), we always need the final answer to be “normalized” on this scale. The algorithm I came to is:
- De-normalize the zoom center onto the full width/height canvas axis ex: (-1,1) → (-512,512)
- De-normalize the mouse’s clientX and clientY onto the full width/height canvas axis ex: (-512, 512)
- Calculate vector A→B where we have a vector representing point B with point A as the new origin. In the above example this would be something like (206, 0): move right 206 x and no change in y
- Normalize vec A→B onto (-1, 1) and scale down by the current scale factor
- Use this as a dx,dy vector from the current normalized zoom center
I use normalization equation from this stack exchange where de-normalization is simply performing the calculation in reverse.
Panning
Lastly I’d like to be able to pan where we can move the zoom center around and view different areas of the canvas. This one was easier, we get the difference being moved which is just a dX, dY, normalize that difference, then scale by the current amount.
Sources:
https://webgl2fundamentals.org/webgl/lessons/webgl-shaders-and-glsl.html